
Picking the right underground cable installers isn’t just another line item on a procurement checklist. It's one of the most critical decisions you'll make, one that directly determines your network's reliability, your budget's integrity, and your customers' satisfaction for decades to come. The work they do—or fail to do—is quite literally the foundation of your service.
Why Your Choice of Underground Installer Is a Partnership, Not a Purchase

Thinking of your installation crew as just another contractor is a recipe for disaster. You need to see them as a crucial partner in your success. An expert team does so much more than dig trenches and pull cable; they become your eyes and ears on the ground, actively heading off the kinds of problems that can derail a project.
I’m talking about the risks that keep network managers up at night: surprise budget overruns, frustrating permit delays that throw schedules into chaos, and, worst of all, network failures that damage your reputation. A seasoned installation partner has seen it all before and knows how to anticipate these issues long before they become emergencies.
The Ground-Level Impact on Network Performance
The quality of that underground work has a direct, tangible effect on your end-users. For an Internet Service Provider (ISP), it’s simple: a sloppy splice or a crushed conduit leads to service degradation, truck rolls, and angry customers. A professional job, on the other hand, means minimal signal loss and maximum durability. The result? Happier customers and lower churn.
And it's not just about last-mile fiber. The promise of 5G and other advanced wireless services depends entirely on a rock-solid fiber backhaul. Those lightning-fast speeds and low-latency connections are impossible without a high-quality, expertly buried infrastructure connecting the cell sites.
A top-tier installation isn't an expense; it's an investment in network integrity. The quality of the work below ground dictates the quality of the service experienced above it, directly impacting everything from customer loyalty to your ability to roll out next-gen services.
The stakes couldn't be higher. A project executed with precision by skilled installers ensures your network works flawlessly today and has the capacity to handle whatever comes next. That forward-thinking approach is what separates a basic contractor from a genuine strategic partner.
An Industry Facing Unprecedented Demand
This kind of specialized work is booming. In 2024, the global market for underground cables—the bedrock of our telecom and power grids—was valued at $32.5 billion. Experts project it will hit $55.1 billion by 2033, growing at a compound annual growth rate of 6.1%. You can dig into the numbers yourself in the full report on the underground cable market.
This explosive growth is driving a global push for more resilient, out-of-sight infrastructure, especially in cities. But it also means the gap between experienced crews and subpar operators is widening. As more projects kick off, your ability to vet and select a partner who can navigate this complex field with skill and an eye on your long-term goals is everything. This guide will walk you through exactly how to do that.
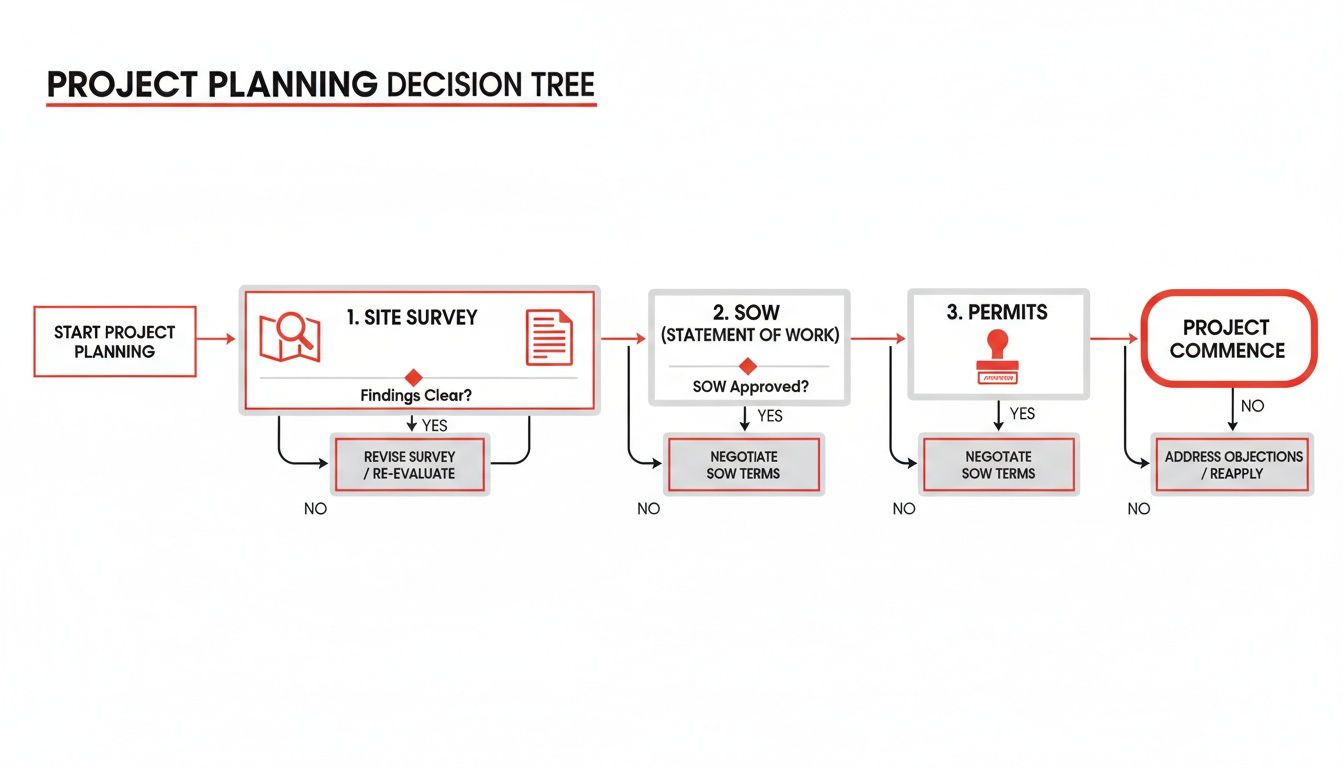
Laying the Groundwork with Project Scoping and Permitting
Long before the first shovel breaks ground, the most critical decisions for your underground cable project are already being made. This initial planning—defining the scope and securing all the necessary permits—is where an expert installation partner really earns their keep. It’s all about turning a high-level goal into a detailed, executable plan to avoid those budget-killing surprises later on.
A great installer acts more like a consultant than an order-taker. They should be right there with you, walking the proposed route and conducting detailed site surveys. The goal isn't just to find the easiest path, but to proactively identify every potential headache: existing utilities, tricky terrain, environmentally sensitive zones, you name it. This on-the-ground analysis is non-negotiable.
Building a Bulletproof Statement of Work
Everything you learn from those site walks feeds directly into your Statement of Work (SOW). Think of the SOW as the constitution for your project. A vague SOW is a recipe for disputes and cost overruns, while a detailed one gets everyone on the same page from day one.
A truly solid SOW must nail down these specifics:
- Detailed Route Maps: I’m talking about precise, georeferenced maps showing the exact installation path, including specific depths and offsets from property lines. No ambiguity.
- Material Specifications: A complete bill of materials is essential. This should list everything from the conduit type and size to the specific fiber optic cable and splice enclosures you’ve agreed upon.
- Obstacle Mitigation Plans: How will you handle that major road crossing or the stretch of solid rock? The SOW needs to outline clear, pre-approved strategies for every challenge identified during the survey.
- Restoration Requirements: Define exactly what "good as new" looks like. This includes everything from reseeding lawns and repairing driveways to perfectly patching asphalt.
This document becomes the single source of truth that guides your underground cable installers and sets a clear bar for quality and completion.
Navigating the Complex Web of Permitting
With a rock-solid SOW, you can tackle the next beast: permitting. Frankly, this can be one of the most maddening parts of any build-out, sending you through a maze of local, state, and sometimes even federal agencies.
Don't ever underestimate the permitting process. I've seen projects get sidelined for weeks, even months, because of a single missed requirement. An installer who knows the local regulators and their quirks can cut through the red tape and keep things moving.
This is where an experienced crew really shines. They’ve been there before and often have working relationships with the very officials who approve the permits. Their expertise is especially vital when securing easements and right-of-way (ROW) access from private landowners or other entities like railroad companies. They’ll provide the technical documents needed to get those crucial signatures.
This isn’t just about filling out forms; it’s about managing risk. You have to be aware of what you’re digging into. The U.S. has an estimated 20 million miles of underground utilities, a staggering network of power lines, water mains, and existing fiber that your crew must carefully avoid.
Before you dig, understanding local regulations like the NJ Contractor Insurance Requirements is essential for compliance and getting your permits approved. To better protect your investment, you can also check out our guide on how to properly manage legal project documentation.
Putting in the effort here with your installer doesn't just save time—it prevents the fundamental planning mistakes that lead to massive change orders and crippling delays. A meticulous approach at this stage sets the foundation for a smooth and successful project.
Getting It in the Ground: Choosing the Right Installation Methods and Materials
Once you’ve scoped your project, the real work begins. Deciding how you’re going to get that cable underground is one of the most critical decisions you'll make, directly impacting your budget, timeline, and the network's long-term health. This isn't just about digging a hole; it's a strategic choice.
This is where having a seasoned crew of underground cable installers really pays off. They’ve seen it all and can guide you through the maze of trenching techniques and material choices. The method for placing conduit is never one-size-fits-all. What works in an open field is a non-starter on a busy city street.
The planning process leading up to this point is its own complex journey. A proper site survey is the bedrock of your entire project, influencing everything from the initial design to the permits you'll need to secure before a single shovel hits the dirt.
As you can see, every early decision has a domino effect. Getting the planning right from the start is what separates a smooth deployment from a logistical nightmare.
Comparing Key Installation Techniques
Let's dig into the three primary ways to install underground conduit. The best approach hinges entirely on the job site, what's already in the ground, and your budget. Choosing the right tool for the job is paramount.
To make this clearer, here’s a quick comparison of the main methods you'll encounter.
Comparison of Underground Installation Methods
| Method | Best For | Pros | Cons |
|---|---|---|---|
| Traditional Open-Cut | Rural or new development areas with minimal surface disruption concerns. | Most cost-effective in open areas; allows for direct visual inspection. | Highly disruptive; requires extensive restoration; slow in populated areas. |
| Micro-Trenching | Dense urban/suburban fiber deployments along existing asphalt or concrete. | Fast and minimally invasive; significantly lower restoration costs and time. | Limited to hard surfaces; shallow depth can be a concern for future work. |
| Horizontal Directional Drill | Crossing roads, rivers, railways, or environmentally sensitive zones. | No surface disruption; can cover long distances; avoids major obstacles. | Highest cost; requires specialized equipment and highly skilled operators. |
Ultimately, a single project might use a combination of all three. A good installer knows how to blend these techniques to create the most efficient path forward.
The true mark of an expert crew is their ability to create a hybrid plan. They might use open-cut trenching for a long stretch in an open field, seamlessly switch to micro-trenching along a quiet residential street, and then deploy a directional drill to get across a four-lane highway—all within the same build.
Sourcing Materials Built to Last
What you put in the ground is just as important as how you get it there. Your installer should be a partner in selecting materials that not only meet today’s technical specs but also simplify future upgrades and stand the test of time. It comes down to three core components: conduit, cable, and enclosures.
Conduit and Ducts: Don't even consider anything other than high-density polyethylene (HDPE) conduit. It’s the gold standard for protecting fiber. It’s tough, flexible enough to navigate bends, and won't corrode or get crushed by shifting soil. A key best practice is always installing conduit instead of direct-burying cable. It might cost a bit more upfront, but it makes future repairs and upgrades infinitely easier—no need for new excavation.
Fiber Optic Cables: The cable itself is the heart of your network. The right choice—whether it's single-mode for long distances or a high-count ribbon fiber for a data center connection—depends completely on your network architecture. A knowledgeable installer will help you source cable that gives you the performance you need today with room to grow tomorrow.
Tracer Wire and Locating Tape: This is one of the most vital yet frequently overlooked parts of an installation. You absolutely must bury a tracer wire alongside any non-metallic conduit. This simple, conductive wire is a lifeline for future crews, allowing them to locate your buried path with standard equipment. Without it, you're just inviting a backhoe to accidentally sever your network, causing costly outages. You can learn more about how tracer wire is integrated into conduit systems in this detailed breakdown.
When you're sourcing these materials, think beyond the initial purchase price. Investing in quality components and a professional installation is an investment in your network's future reliability and a lower total cost of ownership for decades to come.
Ensuring Performance Through Splicing and Testing
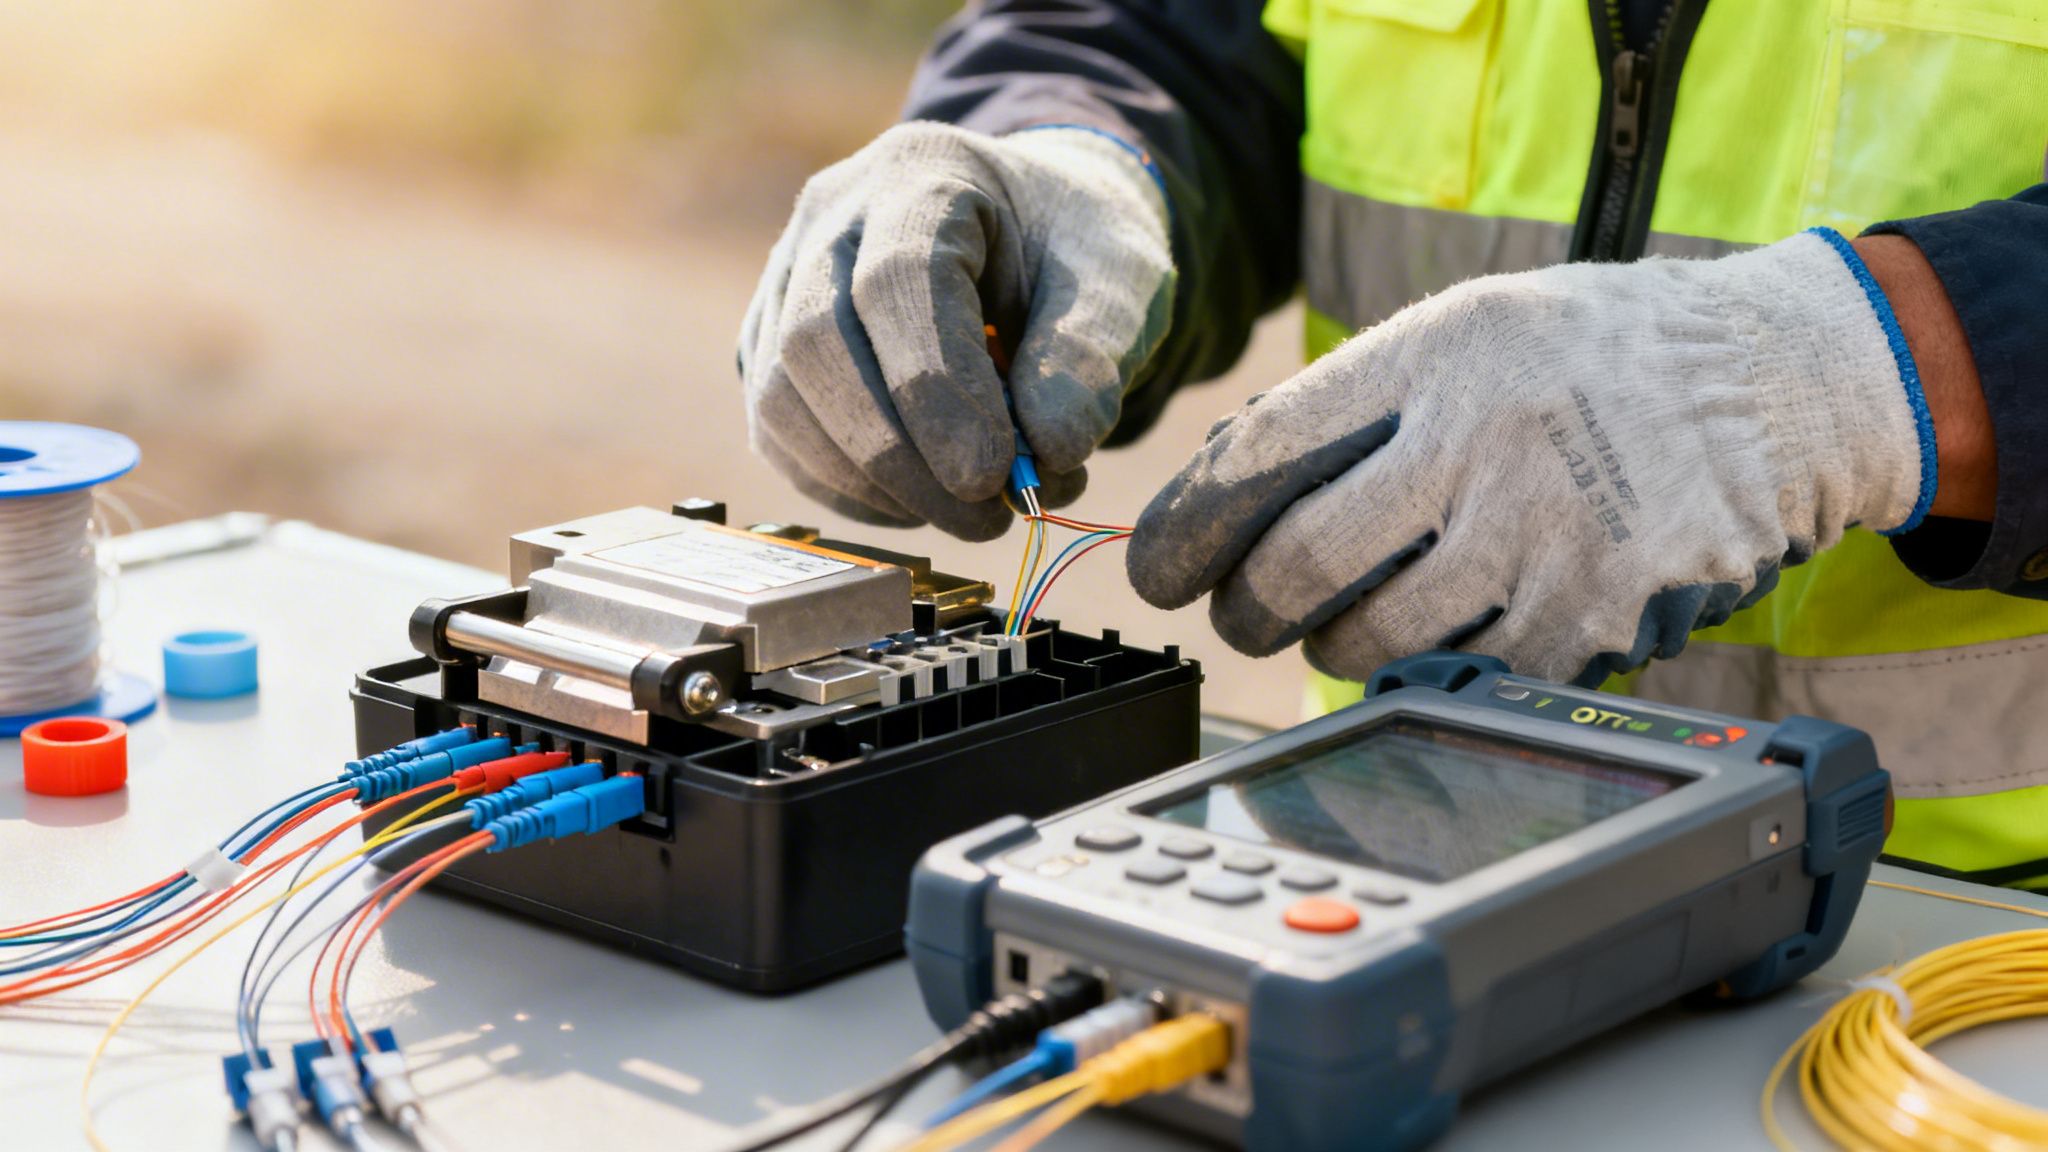
After all the heavy lifting—the planning, trenching, and pulling cable—you get to the part of the project where microscopic details determine success or failure. This is where your chosen underground cable installers really show their stripes. The delicate work of fiber splicing and the rigorous testing that follows are what turn a bundle of dark glass into a high-performance network.
Think about it: every single connection point is a potential point of failure. A sloppy splice introduces signal loss (attenuation), which slowly chokes your network's speed and reach. Now, multiply that tiny loss by hundreds or even thousands of splices in a large build, and you've got a massive, system-wide headache on your hands.
The Art and Science of Fiber Splicing
Joining two fiber optic strands, each thinner than a human hair, is a craft that requires incredible precision. Installers primarily use two different methods—fusion splicing and mechanical splicing. A seasoned pro knows exactly which one to use and when.
Fusion Splicing is the undisputed champion for any permanent network. Using a specialized machine, a technician perfectly aligns and then melts the two fiber ends together with an electric arc. The result is a single, continuous strand of glass.
- Lowest Signal Loss: A well-executed fusion splice creates almost no signal degradation, typically less than 0.02 decibels (dB).
- Permanent and Durable: The welded joint is tucked away safely inside a splice enclosure, making it strong enough to last for decades, no matter the weather.
- Essential for Backbones: For any critical long-haul or backbone route, this is the only way to go. Every fraction of a decibel counts here.
Mechanical Splicing is more of a field-expedient solution. It uses a small clasp-like device to hold two fibers in perfect alignment, using an index-matching gel to help the light pass between them. It’s quick and dirty, but it has its place.
- Higher Signal Loss: You’ll see a much more significant performance hit, usually in the 0.2 dB to 0.75 dB range.
- Temporary or Emergency Use: This is your go-to for quick fixes or temporary setups when getting a connection up is more important than perfect, long-term performance.
- No Power Required: The big advantage is speed and convenience. You can do it anywhere without hauling out a fusion splicer and power source.
For any new network construction, you should write fusion splicing into your contract for all planned connections. An installer’s ability to deliver clean, consistent fusion splices is a tell-tale sign of a high-quality team.
Verifying Quality Through Rigorous Testing
Once the splicing is done, how do you actually know the job was done right? You can't see the light flowing through the fiber. The only way to be sure is through certified testing. This isn't a "nice-to-have"—it's your only proof of performance.
I’ve seen projects where clients skipped the final testing reports to save a little money. Months later, they were chasing mysterious network issues, spending ten times more on emergency diagnostics. Final test reports are non-negotiable—they are the birth certificate of your network.
Top-tier installers use two critical pieces of equipment to certify their work. Knowing what they do and what to look for in the reports is key. You can also dive deeper into how different material properties impact network performance in our detailed guide on understanding electrical conductivity.
OTDR and Power Meter Testing
An Optical Time-Domain Reflectometer (OTDR) is like an ultrasound for your fiber optic cable. It shoots a high-powered pulse of light down the line and analyzes the light that reflects back. The machine generates a "trace," which is a graph that maps out the entire length of the fiber.
Here's what an OTDR trace tells you:
- Total Link Length and Loss: It verifies the exact distance of the run and the total signal loss (in dB) from start to finish.
- Splice and Connector Quality: It "sees" every event—splices, connectors, and bends—and shows you the exact loss at each point. This is how you confirm every splice is under your spec (e.g., less than 0.1 dB).
- Fault Location: If there's a problem, like a break or a sharp bend, the OTDR can pinpoint its location with incredible accuracy.
While the OTDR provides a detailed map, an Optical Loss Test Set (OLTS) gives you the final verdict. Comprised of a light source on one end and a power meter on the other, it measures the total amount of light that makes it through the entire link. This gives you the most accurate "insertion loss" measurement and is often the final pass/fail test.
When the project wraps, demand a complete test package for every last fiber. This means organized, clearly labeled OTDR traces and OLTS results. This data isn't just for your files; it's your proof of a quality installation and will be invaluable for any troubleshooting you have to do down the road.
Keeping Your Project On Time and On Budget
Even the most meticulously planned underground installation can go off the rails without a firm hand on the schedule and budget. Your success comes down to how well you manage these two elements from the very start. This isn't about micromanagement; it's about building a partnership with your underground cable installers where transparency is a daily practice, not a talking point.
The project timeline is your roadmap. It shouldn't be a document you create alone and hand down. A truly workable schedule is built with your installer, reflecting their on-the-ground experience. It needs to break the entire job into smaller, digestible milestones that you can both track, from kickoff to the final sign-off.
Developing a Realistic and Actionable Timeline
The biggest mistake I see is when a client develops a timeline in isolation. Your installation crew knows the real-world time sinks. Sit down with them and map out a schedule that covers not just the trenching, but all the crucial behind-the-scenes work.
Don't forget to account for these critical phases:
- Permit Submission and Approval: This isn't a single checkbox. Factor in realistic review periods for each municipality, which can vary from a few weeks to several months. A delay here can halt everything.
- Material Procurement and Delivery: Supply chains are still unpredictable. Confirm lead times on essentials like conduit, vaults, and especially fiber optic cable before you finalize your start date.
- Make-Ready Engineering and Construction: If you're using existing utility poles or conduits, the prep work is its own mini-project that needs to be scheduled and managed separately.
- Installation and Splicing: Instead of one large block of time, break this down by route or neighborhood. This gives you a much clearer view of actual progress.
- Testing and Acceptance: Set aside dedicated time for OTDR testing, analyzing the results, and fixing any issues that pop up. Rushing this step will only cause headaches later.
Tracking progress is more than a weekly "Are we on time?" email. It requires a steady rhythm of communication. I always insist on mandatory weekly meetings with the installer’s project manager. These are your sessions to review what was accomplished against what was planned, spot problems before they escalate, and make quick decisions to keep the work flowing.
Top-tier installers understand that clear, constant updates are essential. Many use specialized communication software for construction companies to give their clients real-time visibility from the field, which has a massive impact on keeping a project on schedule and budget.
Managing Your Budget and Controlling Costs
Just like the schedule, your budget needs to be built on a foundation of detail, not guesswork. A single, lump-sum number from an installer is a major red flag and often leads to disputes. What you need is a granular, line-item budget to protect yourself from cost overruns and scope creep.
Your budget should always have two key parts: the direct costs and a contingency fund. A contingency of 10-15% of the total project cost is standard. This isn't a slush fund for mistakes; it's a planned buffer for true unknowns, like hitting unexpected rock formations or discovering an old, abandoned utility line that wasn’t on any map.
Think of your budget as a living document. It requires constant monitoring and management. Reviewing invoices shouldn't be a rubber-stamp exercise; it's a crucial checkpoint to ensure the work billed matches the progress made in the field.
When you get down to the brass tacks of financial management, keep a close eye on these areas:
Contract Model: A Time and Materials (T&M) contract is flexible but demands your constant oversight to keep costs in check. A Fixed-Price contract gives you cost certainty but can be inflexible. I’ve found a hybrid approach often works best—use fixed pricing for predictable work (like trenching a certain number of feet) and T&M for unknowns like rock excavation.
Change Order Process: Changes are inevitable. The key is to have a rigid, formal process for managing them. Any change order must spell out exactly why it’s needed, how it will affect the timeline, and what the precise cost will be—before any extra work begins.
Invoice Review: Scrutinize every single invoice. Do the labor hours match the crew size you saw on-site? Does the billed progress align with your own field reports? This is your frontline defense for catching errors before they compound.
By taking an active role in managing your project's schedule and finances, you shift from being a spectator to a true partner. This collaborative control is the single most effective way to get your fiber network built and activated without a storm of costly surprises.
Finalizing the Project Handoff and Maintenance Plan
Don't make the mistake of thinking the project is over just because the crew has packed up. The final handoff from your underground cable installers is where you secure the long-term value of your investment. This is the moment they transfer all the operational knowledge you'll need for the life of the network.
Getting this part right is what separates a successful project from a future maintenance nightmare. It all comes down to two things: bulletproof documentation and a clear plan for what happens next.
Securing Comprehensive As-Built Documentation
The absolute linchpin of a successful handoff is the as-built documentation. This isn't just a handful of files; it's the definitive operational blueprint for your brand-new infrastructure. You can think of it as the network's birth certificate, owner's manual, and GPS all rolled into one.
A vague map simply won't cut it when you're trying to diagnose a problem years down the road. You have to insist on a complete package from your installer that contains everything needed for future maintenance, troubleshooting, or expansion.
At a minimum, your final documentation package must include:
- Final Route Maps: These should be georeferenced digital files (KML or SHP formats are common) with precise GPS coordinates of the entire path. Crucially, they must include depth measurements taken at regular intervals.
- Splice and Enclosure Details: You need detailed diagrams for every single splice case, showing exactly which fibers are connected to which. This should be paired with the exact locations of all handholes, pedestals, and vaults.
- Certified Test Results: Get the full set of OTDR traces and OLTS power meter reports for every fiber strand. This is your proof that the network meets the signal loss and performance standards you agreed to in the contract.
When an outage hits at 2 AM, this documentation is what turns a multi-day search party into a two-hour surgical repair. Having an exact map of the fiber path and splice points can literally save you thousands in lost revenue and emergency crew costs.
To ensure nothing is missed, we've compiled a checklist of the essential documents you'll need to collect from your installer.
Post-Installation Documentation Checklist
This table outlines the critical documents and data you should receive from your installer before signing off on the project. Having this complete package is non-negotiable for effective long-term network management.
| Document Type | Key Information Included | Why It's Critical |
|---|---|---|
| As-Built Maps | Final GPS-accurate route, depth markings, utility crossings, and point-of-interest locations (e.g., manholes, pedestals). | Essential for any future digs, expansions, or repairs. Prevents accidental damage and speeds up fault location. |
| Splice Diagrams | Fiber-level connection details for every splice case, including buffer tube and fiber color code assignments. | Without this, troubleshooting a dead fiber or re-routing a circuit is nearly impossible and incredibly time-consuming. |
| OTDR & OLTS Test Reports | Certified traces and loss/power readings for every fiber strand, including event tables (splices, connectors). | Provides the performance baseline for your network. It's your proof of quality and the first thing you'll compare against during future troubleshooting. |
| Material & Equipment List | A complete inventory of the specific cable, conduit, enclosures, and connectors used throughout the project. | Critical for ordering the correct matching components for future repairs or expansions. |
| Permit & ROW Documents | Copies of all finalized permits, right-of-way agreements, and municipal approvals. | Provides a legal record of your right to occupy the space and can be vital in disputes with property owners or other utilities. |
Securing this documentation package before you make the final payment gives you the leverage you need to ensure it's complete and accurate.
Establishing Long-Term Support and Maintenance
With the network built and the paperwork in hand, the last piece of the puzzle is defining your ongoing support structure. This conversation starts with the warranty period. A one-year warranty covering defects in materials and workmanship is standard, but you need to read the fine print. Your contract should spell out exactly what's covered and, more importantly, the installer's guaranteed response time.
Beyond that initial warranty, it’s smart to discuss an ongoing maintenance and emergency response agreement. This is especially true if your in-house team isn't equipped with specialized gear like fusion splicers or OTDRs. Sticking with your original installer for this makes a lot of sense—they already know your network inside and out.
A good service level agreement (SLA) should clearly define expectations for:
- Routine Inspections: Scheduled walk-throughs to check on pedestals, vaults, and other visible hardware.
- Emergency Restoration: A guaranteed response time (e.g., 4-hour on-site) for critical events like a fiber cut.
- Locate Services: Support for the "811 Call Before You Dig" process to mark your fiber lines ahead of any third-party excavation.
This kind of proactive planning is what transforms a construction project into a reliable, manageable asset that's ready to perform for decades to come.
Expert Answers to Common Field Questions
Even the most buttoned-up project plan will run into questions once the crews are on the ground. Here are some of the things we get asked most often by carriers, municipalities, and data center operators who are navigating the realities of a major fiber build.
What Do We Do About Unexpected Rock or Buried Debris?
This is probably the number one question on any underground project. The truth is, you can't know everything that's buried underground. That's why a seasoned underground cable installer starts every project with a healthy dose of skepticism and a lot of prep work.
Before a single shovel hits the dirt, they should be using Ground Penetrating Radar (GPR) and coordinating with 811 to get the best possible map of existing utilities. But the real key is in the contract. Your agreement absolutely must have a clear process for handling "unforeseen conditions." When your crew inevitably hits a ledge of solid rock, the contract should trigger a change order process where your installation partner presents you with options—like bringing in a rock saw or finding a viable reroute—along with a transparent breakdown of how it impacts the cost and schedule.
Micro-Trenching vs. Traditional Trenching: Which is Right for My Project?
Think of it this way: traditional trenching is the heavy-duty, open-road option, while micro-trenching is the surgical, city-street solution.
Traditional Trenching involves digging a fairly wide and deep channel, usually around 1-2 feet wide. It's a proven method and works perfectly for new construction or in rural areas where you have plenty of open space and aren't worried about disrupting traffic or tearing up pristine landscaping.
Micro-Trenching, on the other hand, is all about precision and speed in congested areas. A specialized saw cuts a clean, narrow slot just 1-2 inches wide directly into asphalt or concrete. It’s significantly faster, creates far less disruption, and makes deploying fiber in dense urban centers a much cleaner, quicker process.
The core of long-term reliability is built on installation quality. This starts with using top-tier materials, performing meticulous fusion splicing, and obtaining certified OTDR test results for every single fiber strand.
How Can We Guarantee Our New Network Will Be Reliable for Decades?
Reliability isn't an accident; it's the result of diligent work and, most importantly, fantastic documentation. The single most valuable thing you will receive at the end of the project is a set of detailed as-built documents.
This isn't just a formality. These documents are the definitive map of your network, showing precise route paths, splice locations, and fiber assignments. Without them, any future maintenance, repairs, or upgrades become a frustrating and expensive guessing game. For true peace of mind, find a partner who not only builds the network but also offers ongoing maintenance and emergency restoration. That continuous relationship is the best insurance policy you can have for the life of your fiber.
For over 20 years, Southern Tier Resources has been the trusted partner for delivering complex fiber optic infrastructure projects. From initial design and permitting to expert installation and long-term maintenance, we provide the end-to-end solutions that keep your network running. Contact us today to discuss your next project.