A successful fiber optic installation isn't about the cable itself—it's about the groundwork. I've seen countless projects get bogged down, go over budget, or fail outright because the initial planning was rushed. Getting the pre-construction phase right, from engineering the route to securing the permits, is the single most important thing you can do to ensure a smooth build.
Planning Your Fiber Optic Cable Installation
Before a single shovel hits the dirt, a comprehensive planning phase sets the tone for the entire project. This is far more than just sketching lines on a map. It's a detailed, methodical process that involves on-the-ground surveys, navigating a complex web of regulations, and engineering a route that's both efficient and cost-effective. Skipping these steps is a recipe for expensive delays and logistical nightmares.

It all starts with a meticulous site survey. And I don't mean a quick walkthrough. A professional survey team digs deep to identify every potential obstacle, both visible and buried. Key things they're looking for include:
- Existing Utilities: You absolutely must locate all underground gas, water, power, and communication lines. Hitting a utility line isn't just an inconvenience; it's a dangerous, costly emergency that stops work immediately.
- Environmental Hurdles: Discovering wetlands, protected wildlife habitats, or challenging terrain like bedrock early in the process allows your engineers to design a path around them, avoiding major permitting headaches.
- Man-Made Barriers: You need to document every road, railway, bridge, and existing structure. This information is critical for determining where you'll need specialized construction methods, like directional boring, instead of simple trenching.
Navigating Permits and Rights-of-Way
Once you have a proposed route, the real paperwork begins. Securing the legal permissions—the permits and right-of-way (ROW) agreements—is often the longest pole in the tent. Every municipality, county, state, and federal agency has its own unique set of rules, fee structures, and review timelines.
A rookie mistake I see all the time is underestimating the permitting timeline. A single missing signature or a misfiled form can sideline a multi-million dollar project for weeks, if not months. Meanwhile, your crews and equipment are sitting idle, burning through cash.
There’s a reason for this focus: real-world project data shows that civil works and ROW acquisition make up a massive portion of the total build cost. We're often talking 40%–60% of the entire deployment budget. Trenching, boring, and making utility poles ready for new attachments are all labor-intensive, and their costs scale directly with the distance and complexity of the environment.
Engineering the Optimal Route
With survey data and permits in hand, the engineers can finally transform the conceptual route into a practical, buildable plan. This is where theory meets reality. They’ll analyze a host of factors to finalize the design:
- Aerial vs. Underground: If you're going aerial, a pole loading analysis is non-negotiable. You have to prove the existing poles can handle the added weight and wind load of your new fiber cable. For underground paths, a geotechnical analysis is key to understanding the soil conditions and what machinery you'll need.
- Cost Optimization: The shortest route is rarely the cheapest. A slightly longer path that avoids a major river crossing or a patch of solid rock can end up saving hundreds of thousands of dollars in specialized construction costs.
- Future-Proofing: A smart design doesn't just solve for today. It builds in room for future growth. That means including strategic slack loops for repairs and planning access points that will make it easy to connect new customers down the road without major new construction.
This kind of careful, upfront planning is the hallmark of all professional fiber optic construction projects and is essential for a smooth execution. Before moving to the physical installation, it's always a good idea to review general installation guidance to make sure all your bases are covered.
This table breaks down the critical stages that happen long before the first cable is ever pulled.
Key Stages of Fiber Optic Pre-Construction
| Stage | Primary Objective | Key Considerations |
|---|---|---|
| Route Feasibility Study | Determine the most viable path from Point A to Point B. | Initial cost estimates, major obstacles, high-level permit needs. |
| Detailed Site Survey | Document all physical and environmental conditions along the route. | Utility locates, terrain analysis, access point identification. |
| Permitting & ROW | Secure all necessary legal approvals for construction. | Land ownership, municipal codes, environmental regulations. |
| Final Route Engineering | Create detailed construction blueprints and specifications. | Pole loading, conduit sizing, boring vs. trenching decisions. |
Getting these four stages right is what separates a well-run project from a chaotic one. It ensures that when it's time to build, your crews have a clear, actionable plan to follow.
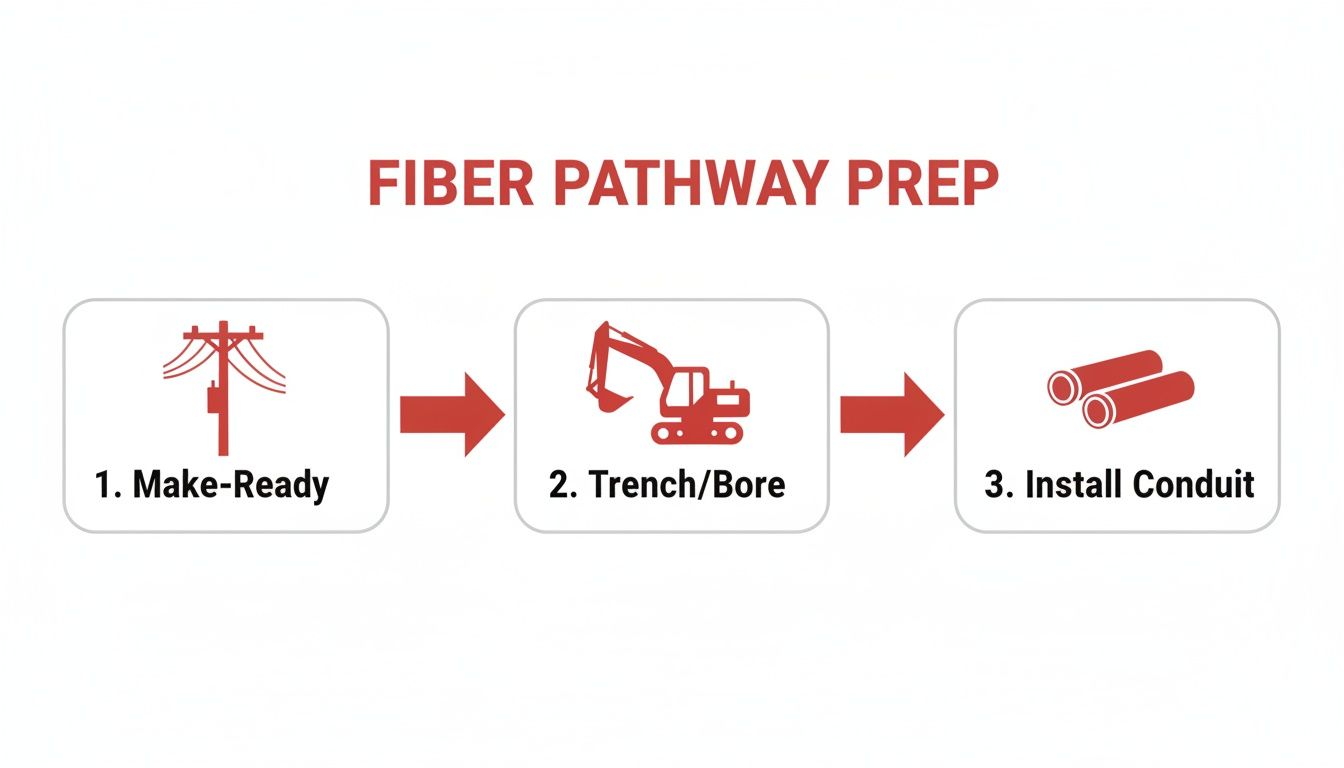
Preparing the Pathway for Installation
With your plan locked in, it's time to move from blueprints to the real world. This is where we build the physical pathway that will protect your fiber optic cable for decades to come. This stage is all about heavy lifting—both in the ground and in the air—and it demands absolute precision and strict adherence to the engineered designs.
Frankly, the quality of this pathway work directly dictates how smoothly the actual cable installation will go and, more importantly, how reliable the network will be long-term.
Whether you're stringing cable on poles or burying it, this prep work is the foundation of the entire project. For aerial routes, we call this "make-ready" work. For underground paths, it means creating a clean, continuous channel from point A to point B.
Mastering Aerial Make-Ready Work
Before a single strand of fiber goes up, the utility poles have to be ready to handle the new load. This whole process is called make-ready construction, and it’s a critical step that requires constant communication with the pole owners—usually power and telephone companies. It's a meticulous job that ensures you're meeting all safety codes and avoiding future problems.
The key tasks in any aerial make-ready job include:
- Pole Transfers: Often, you’ll find that existing utility cables need to be shifted to make room for your new fiber line. This is a delicate dance that has to be coordinated perfectly to prevent any service interruptions for their customers.
- Hardware Installation: Our crews will be up on the poles installing new hardware, like brackets and anchors, which will eventually support the fiber cable and its messenger strand.
- Messenger Strand Tensioning: We don't hang the fiber directly. First, a steel messenger strand goes up to act as the support structure. Getting the tension right on this strand is an art and a science; it needs to be tight enough to minimize sag but have enough give to handle wind and ice loading without failing.
I’ve seen projects delayed for weeks because a pole owner discovered unapproved attachments during a post-construction audit. Always get written approval for every piece of hardware and every cable placement. It’s a painstaking process, but it prevents costly rework and maintains good relationships with utility partners.
Choosing Your Underground Construction Method
When your route has to go underground, you’ve got a few different ways to create the conduit pathway. The right choice really comes down to the environment, local rules, and, of course, the budget. No matter which method you use, a lot of groundwork is needed before any cable sees the light of day, often involving specialized construction and utility contracting in fiber optic projects.
Open Trenching is the old-school method. You dig a trench, lay your conduit, and fill it back in. It's simple and cost-effective when you're out in open, undeveloped areas. But try that in a downtown core or a quiet suburb, and you’ll create a massive disruption to traffic and landscaping.
That’s why, in more sensitive areas, we lean on less invasive techniques.
- Micro-Trenching: This is a much slicker approach where we cut a very narrow, shallow slot—think 1-2 inches wide and 12-24 inches deep—right along sidewalks or the edge of a road. It’s incredibly fast and far less disruptive, which makes it perfect for crowded urban deployments.
- Horizontal Directional Drilling (HDD): Got a river, a busy highway, or a protected wetland in your path? HDD is your answer. We guide a drill head underground from an entry point to an exit point, completely avoiding any surface disruption, and then pull the conduit back through the bored path.
Figuring out which method to use is a major part of the engineering phase. An experienced partner in heavy civil construction can be invaluable here, helping you pinpoint the most efficient and cost-effective strategy for your specific route.
At the end of the day, the goal is the same: install a clean, sealed, and continuous conduit system. If you get that right, the actual fiber installation—whether you're blowing it or pulling it—will be smooth and snag-free, protecting those delicate glass fibers from any damage.
Getting the Fiber in the Duct: The Art of the Pull or Blow
Once your pathway is prepped and ready, it's time for the main event: getting the fiber optic cable into the conduit. This is where the real skill comes in. You're dealing with fragile strands of glass, and this is the stage where they're most at risk. The two go-to methods for this are the old-school cable pull and the more modern technique of cable blowing, or jetting.
The demand for this work is exploding. We're installing millions of kilometers of new fiber every year to keep up with global connectivity needs. This boom is why the fiber-optic cable market, valued at around USD 13.0 billion in 2024, is on track to more than double by the early 2030s. If you're interested in the numbers behind this growth, the full fiber optic cable market analysis offers a deep dive.
This whole process builds on itself. The civil work—the make-ready, trenching, and conduit installation—has to be spot-on before you even think about bringing the delicate fiber on-site.
As you can see, a successful installation is a sequence. Each step lays the groundwork for the next, creating that clear, secure path the cable needs.
The Traditional Cable Pull
For shorter runs, especially those with a few tricky bends inside a building or on a campus, traditional pulling is a solid, proven method. But let's be clear: this isn't just tying a rope to the end and heaving. The entire game is about managing tension to keep from stretching or snapping those glass fibers.
Professional crews rely on a capstan winch. This isn't your average winch; it's designed to apply a perfectly smooth and consistent pulling force. A dynamometer is always used in-line to monitor the tension in real-time. Exceeding the cable's maximum rated pulling tension is the cardinal sin of fiber installation—it's a mistake you can't undo.
Lubrication is another absolute must. As the cable enters the conduit, a high-quality, fiber-specific lubricant is applied continuously. This one simple step can slash the required pulling force by as much as 70%. That means less stress on the cable and a much smoother, safer operation all around.
The Modern Approach: Cable Blowing
When you're dealing with long-haul routes or straight shots running for kilometers, cable blowing has completely taken over as the industry standard. The technique is brilliant in its simplicity: use high-volume compressed air to float the cable through the conduit, which just about eliminates pulling tension altogether.
A specialized blowing machine clamps onto the conduit and injects a massive amount of air. This creates a powerful jet stream that literally lifts a lightweight, specially designed fiber cable and carries it down the duct.
- Virtually No Stress: The cable is essentially riding on a cushion of air. The only real force it feels is a gentle nudge from the pusher on the machine, meaning tensile stress is practically zero.
- Incredible Distances: It's not uncommon for a crew to blow a single, continuous piece of fiber for 3,000 meters (almost 2 miles) or even more. This drastically cuts down on the number of splices you need, which is always a good thing for network integrity.
- Serious Speed: With a clean, straight pathway, cable jetting is way faster than pulling. It can make a huge difference in hitting tight project deadlines.
The secret to a perfect installation isn't just the pull or blow itself. It's what happens at the ends. Meticulously planning for and leaving service slack loops at every splice vault, termination point, and mid-span access location is non-negotiable. Those extra coils of cable are your future insurance policy, allowing for easy repairs or network changes down the road without having to run a whole new line.
So, which method is best? It always comes down to the job. A complex, short pull inside a data center is perfect for a traditional, controlled pull. A long-distance carrier backbone is a no-brainer for blowing. Executing either one correctly ensures the fiber gets where it's going completely unharmed, ready for the final steps of splicing and termination.
Mastering Fiber Optic Splicing and Termination
Once your fiber is pulled and resting securely in its pathway, the real precision work begins. This is where we bring the network to life by connecting the individual, hair-thin strands of glass. It’s a craft that demands a steady hand, a surgically clean environment, and some highly specialized gear.
We're not just connecting cables; we're creating a seamless path for light. The goal is a connection so perfect that the signal passes through with virtually zero loss. This crucial stage breaks down into two main skills: splicing, which permanently joins two fibers, and termination, which puts a connector on the end of a fiber. Getting both right is non-negotiable for a high-performance network.

The Gold Standard: Fusion Splicing
For any permanent installation, whether it’s in a data center or out in the field, fusion splicing is the undisputed king. The process uses an electric arc to literally weld two glass fibers into a single, continuous strand. A top-notch fusion splice will have an optical loss of less than 0.02 decibels (dB)—that’s about as close to a perfect connection as you can get.
It’s a methodical, step-by-step process that can't be rushed.
- Fiber Stripping: You start by carefully removing the outer jacket and buffer coatings to expose the bare glass fiber.
- Cleaning: Next, you use 99% isopropyl alcohol and lint-free wipes to clean the bare fiber. Any speck of dust or residue here will ruin the splice.
- Cleaving: Using a high-precision cleaver, you score and break the fiber to create a perfectly flat end-face. A bad cleave is the number one reason splices fail.
- Splicing: Finally, you place the prepared fibers into a fusion splicer. The machine’s cameras automatically align the cores with microscopic precision before the electric arc fuses them together.
After the fuse, a small heat-shrink sleeve protects the delicate joint, which is then carefully placed in a splice tray or closure. For a much more detailed walkthrough of the tools and techniques, check out our guide on how to splice fiber optic cable.
Choosing the Right Splicing Method
Deciding between fusion and mechanical splicing really comes down to performance versus practicality. One is for building a network to last, while the other is a get-out-of-jail-free card for field emergencies.
Fusion Splicing vs. Mechanical Splicing
| Attribute | Fusion Splicing | Mechanical Splicing |
|---|---|---|
| Performance (Loss) | Very Low (< 0.02 dB) | Higher (0.2 dB – 0.75 dB) |
| Typical Use Case | Permanent network construction | Temporary repairs, restoration |
| Initial Cost | High (splicer is expensive) | Low (no expensive machine) |
| Per-Splice Cost | Very Low | Higher (each splice is a consumable) |
| Reliability | Excellent long-term stability | Good for short-term use |
While a fusion splicer is a significant investment, its reliability and near-perfect performance make it the only real choice for permanent network infrastructure. Mechanical splices are a fantastic tool to have in your bag but should always be seen as a temporary fix.
The Last Mile: Termination
Termination is how we get the fiber ready to plug into something—a switch, a patch panel, or a customer's modem. This means attaching a connector, like an SC or LC type, to the end of the fiber strand. The quality of this final connection point is every bit as important as a good splice.
These days, the most reliable approach is to fusion splice a factory-terminated pigtail onto the field cable. This gives you a perfect, machine-polished connector end-face without the hassle and inconsistency of trying to hand-polish connectors in the field—a practice that is thankfully becoming a thing of the past.
No matter how you terminate, the final step is always the same: inspect and clean. Every single connector should be examined with a fiber scope before it's plugged in. A microscopic piece of dust is all it takes to block the signal, leading to high loss and frustrating performance problems. A clean connection is a reliable connection.
Testing and Certifying Your Network Performance
An installation is just a construction project until you can prove it works. After the splicing trucks drive off and the last connector is plugged in, the real work begins: testing and certification. This is the moment you transform a physical build into a carrier-grade network, generating the hard data that proves your installation meets every single performance spec.
Without meticulous testing, you're essentially flying blind. You have no real way to verify the quality of your splices, spot hidden stress points in the cable, or confirm that the total signal loss is within the tight limits defined in the project plan. This stage isn’t just a final check; it's the official sign-off that the network is truly ready for service.
Decoding the OTDR Trace
The most powerful tool in any fiber technician's kit is the Optical Time Domain Reflectometer (OTDR). Think of it like radar for your fiber line. The device sends a pulse of light down the strand and then measures the light that gets reflected or scattered back. The result is a graphical "trace"—a complete picture of the entire fiber link, revealing its secrets from end to end.
Learning to read an OTDR trace is a fundamental skill. A seasoned technician can use it to:
- Pinpoint Splices and Connectors: Every event along the fiber, whether it's a fusion splice or a connector pair, shows up as a distinct signature on the trace. The OTDR can measure the exact loss at each point, instantly telling you if a splice is good (low loss) or needs to be redone (high loss).
- Identify Stress Points: The trace will also reveal issues like macrobends (sharp bends in the cable) or pinch points that are causing signal degradation. This lets you find and fix physical installation problems before they ever impact service.
- Measure Exact Fiber Length: An OTDR calculates the precise distance to every event and to the end of the fiber, which is absolutely critical for documentation and future troubleshooting.
Think of an OTDR trace as a fingerprint for each fiber strand. It provides a permanent, detailed record of the link's health at the moment of installation. This baseline data is invaluable for future maintenance, allowing you to quickly identify any new faults that may develop over time.
Confirming the Loss Budget with an OLTS
While the OTDR gives you a detailed, event-by-event breakdown, the Optical Loss Test Set (OLTS) gives you the bottom line. An OLTS, which is simply a light source and a power meter, measures the total amount of signal loss—also known as insertion loss—across the entire fiber link.
This single measurement is then compared against the loss budget that was carefully calculated back in the engineering phase. Passing this test confirms that the cumulative loss from every component—the cable itself, all the splices, and every connector—is below the maximum threshold the network equipment can handle. If it fails, you know you have a systemic issue that needs to be diagnosed with the OTDR.
Scaling Up Testing for Large Builds
On a professional build, the sheer scale of acceptance testing can be staggering. We live and die by measurable metrics. For instance, a middle-mile fiber project might demand fusion splicing rates of 200–800 splices per technician per week. The testing volume scales right alongside that workload.
A standard test plan requires OTDR traces and insertion loss tests on every single fiber. On a project with several thousand fibers, that means generating and archiving thousands of OTDR files and tens of thousands of loss measurements to give the client the comprehensive documentation they require. You can get a sense of the industry's scale from the latest fiber optic cable market research.
Proper documentation isn't just a formality; it's a contractual requirement for project handoff. Detailed test reports, including OTDR traces and OLTS results for every strand, are compiled into a final package. This documentation becomes the network's official birth certificate, giving the client the proof of performance they need to accept the build and, most importantly, turn up service.
Common Questions from the Field
No matter how solid your construction plans are, questions always pop up on the job site. Installing fiber optic cable is a game of inches and tiny details, where one small oversight can cause a massive headache down the line. Let's dig into some of the real-world questions our technicians tackle every day, moving past the textbook answers to give you practical advice for a smooth, high-quality installation.
Getting this right isn't just about following a checklist; it's about understanding the "why" behind every step.
What Are the Most Critical Safety Precautions?
On any fiber installation site, safety is priority one, and it’s about a lot more than just wearing a hard hat. The biggest risks are often the ones you can't see, which means every member of the crew has to stay vigilant.
The most serious invisible threat is eye damage. The lasers in fiber optic systems can shoot out infrared light that's completely invisible but powerful enough to cause permanent blindness in an instant.
- Never, ever look directly into a fiber end or connector. The golden rule is to assume every fiber is live until you've personally verified it's disconnected and locked out at the source.
- Use a power meter to confirm a fiber is dark. This is the only truly safe way to know for sure that no light is present before you scope it or connect it.
- Always wear safety glasses with side shields. This protects your eyes from more than just laser light; it also guards against the tiny glass shards created when you strip and cleave fiber.
Speaking of those shards, handling the glass itself is a hazard. When you cleave a fiber, you're creating microscopic glass splinters that can easily get stuck in your skin or, worse, ingested. Technicians should always work on a dark, non-reflective mat to make these shards visible and must dispose of them immediately in a sealed, clearly labeled container. A strict "no food or drink" rule in the work area is non-negotiable.
How Do You Calculate Maximum Pulling Tension?
This is a big one. Get this calculation wrong, and you can literally tear a brand-new cable apart before it's even fully installed. Every fiber optic cable comes with a maximum pulling tension specified by the manufacturer, usually measured in pounds or Newtons. Go over that limit, and you risk stretching the delicate optical fibers inside, causing permanent damage and crippling signal loss.
The formula for figuring out your pulling tension isn't just about the cable's rating; it's about the real-world conditions of your specific pull.
A simplified calculation we often use in the field is:
Tension = L x W x f
Where:
- L = The length of your pull (in feet)
- W = The cable's weight (in pounds per foot)
- f = The coefficient of friction between the cable jacket and the conduit
That coefficient of friction is the real wild card. It can be as high as 0.5 for a dry pull through an old, rough conduit or drop to 0.15 or even lower when you use a high-quality, fiber-specific lubricant. This is precisely why proper lubrication isn't optional—it drastically lowers the stress on your cable. For any run with bends, you also have to factor in the "back tension" each turn adds to the equation.
The rule of thumb on my crews is simple: if the dynamometer shows we are approaching 80% of the cable's maximum rated tension, we stop the pull immediately. We then troubleshoot the problem—is there a snag, not enough lubricant, or a collapsed duct?—before ever thinking about proceeding. It's better to re-evaluate than to scrap thousands of dollars' worth of cable.
What Are the Most Frequent Installation Mistakes?
When projects run into delays or fail performance tests, it usually traces back to a handful of common, and completely avoidable, mistakes. Knowing what these pitfalls are is the first step to making sure they don't happen on your job.
A huge one is improper slack management. Forgetting to leave enough slack in loops at splice points, termination panels, and mid-span locations creates a nightmare for anyone who has to do repairs or make network changes later. A few extra feet of cable now can save a fortune in labor and network downtime in the future.
Another all-too-common error is exceeding the cable’s minimum bend radius. Every cable has a specific radius it can be bent to before the fibers inside are damaged. Kinking a cable around a sharp corner in a vault or pulling it too tightly over a sheave can create a macrobend—a point of high signal loss that's an automatic fail during certification testing.
Finally, contaminated connector end-faces are a chronic problem. A single microscopic dust particle is all it takes to block the signal entirely. The old "plug and pray" method is a recipe for disaster. Every single connector needs to be inspected with a fiber scope and cleaned if necessary before it's mated. This one simple, disciplined habit prevents countless hours of troubleshooting later on.
At Southern Tier Resources, we build networks with the precision and foresight that prevent these common issues. Our expert crews understand the nuances of a successful installation, from initial engineering to final certification. Partner with us to ensure your network is built for performance and reliability from day one. Learn more about our end-to-end fiber optic services.